


The following email was exchanged with my sister today:
Me: An entire barbacoa bowl just fell into my mouth. It just fell in. Not quite sure how it happened.
Maggie: That's really odd, bc some women shoved an entire Whataburger JR with cheese in my mouth at the drive thru at Whataburger. I'm not even sure how I got there.
Friday, March 27, 2009
Friday, February 27, 2009
Little Known Fact
Contrary to popular belief, auditors don't actually enjoy finding errors. It only creates more work for us.
Thursday, February 26, 2009
The Housewife Wannabe Cooks: Mystery Rolls (Balls)
I have died and gone to heaven. A buttery death that has landed me in blue cheese heaven. And I don't regret it a bit.
I found this recipe on one of my new favorite websites, The Pioneer Woman, and immediately knew they were for me. Biscuits? Love them. Butter? LOVE it. Blue cheese? OMG IS THAT EVEN A QUESTION? I made these this past Sunday and subsequently was required to freeze about half of them before I ate the whole pan. I was starving when I made them, so didn't bother taking pictures, but severely regretted this decision as this is definitely a recipe to be shared. But thankfully, my lovely sister had a work potluck this week and it gave me the perfect opportunity to capture these Mystery Rolls (Maggie and I have renamed them Mystery Balls - we believe it adds to the mystery).
I think another thing I like about them is their potential versatility. While I haven't done it, I would imagine you could replace the blue cheese with another aged cheese to match your meal. Italian? Try some Parmesan. Greek? Feta, clearly. Mexican? Cojita. Chinese? Um... do the Chinese eat cheese?
Anyhow, here's the recipe.
What you need:

1 can flaky biscuits (pretend there's only one in the picture above)
Approximately 4 oz. blue cheese
1 stick butter
Maggie accidentally bought regular Buttermilk and while they were good, based on my experience with the first round, I would highly recommend the flaky kind. Much more absorbent. For the butter. And the cheese. But primarily for the butter.

Although, this can does a better job of resembling what your stomach will look like if you eat the whole pan.
Also, we used pre-crumbled blue cheese in this round whereas I used the chuck and crumbled it myself for the first go-round. Not sure if it had to do with the biscuits, but I think I preferred the chunk. Much more robust.
1. Place the butter in a baking pan.

2. Crumble the blue cheese and sprinkle over the butter.

3. Melt in the oven. I didn't time it, just checked on it occasionally.
4. While butter and blue cheese are melting, cut the biscuits into fourths.


Maggie really wanted them to be balls.
5. After removing the butter/cheese mixture from the oven, stir to mix thoroughly.

6. Roll the biscuits in the butter/cheese.

7. Bake in the same pan you melted the butter and cheese. I did this the first time, but when Maggie and I made them together, we were making so many that we had to distribute some to cookie sheets. Believe me. Much better when baked in the butter. This may seem like a gluttonous, heart clogging step. And it is. But it makes them much better. Your arteries will hate me, but your mouth will love me.

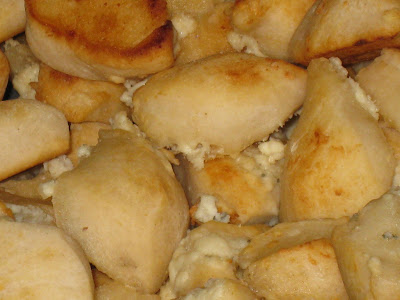 OMG - would you look at the golden buttery cheesiness?
NOW - EAT!
Hey, but really... do the Chinese eat cheese?
Tuesday, February 24, 2009
The Housewife Wannabe Cooks: Mardi Gras King Cake
King Cake is one of those desserts that I seriously dream about. You think I'm lying, but if I were to go to New Orleans right now, I'd buy about 15 of them. And probably down them within a week. You think I'm kidding. I'm not.
No, seriously. I love King Cake.
Anyhow, I was first introduced to King Cake in middle school French class when Mme Dodson was teaching us about Mardi Gras. We would have a Mardi Gras celebration and order a King Cake from La Madeleine and whoever got the baby received a prize. While the King Cake was good, my highly developed 7th grade taste buds were not thoroughly impressed.
HOWEVER! My true affair with King Cake began in 2006 when I lived with my good friend Nicole. Nicole's mom is originally from New Orleans and every year around Mardi Gras, we'd get a fresh King Cake from deep in the French Quarter. And when these King Cakes would arrive... WATCH. OUT.
I used to try and trick myself into thinking that I wasn't eating that much, because I'd just cut a sliver here and a sliver there. And then I would look at the King Cake and realized I'd already eaten half of it. And I hadn't even left for work yet.
No, seriously. I love King Cake.
I'd always wanted to attempt to make it, but never really felt like making dough from flour, yeast, rolling it out, etc. I like cooking and baking, but nothing that intense unless it's a really special occasion. However, few weekends ago I was flipping through the TV and because it was Sunday morning and there were no crime shows on, I settled on Semi-Homemade with Sandra Lee. Sidenote: This woman has some really good ideas, but damn if there isn't something about her that makes me want to punch her square in the jaw. Not sure what it is. But, the recipe seemed easy, so thought I would try it.
Two caveats: Although Mardi Gras was today, I actually made this a couple of weeks ago. Sprinkling purple, green, and yellow sugar didn't seem appropriate at the time, so I just used chocolate sprinkles instead. Also, since I wasn't making this for Mardi Gras and no special guests in particular, I didn't insert the plastic baby. If you wanted to do that, you would hide the baby in one of the braids after removing the cake from the oven and before frosting it.
What you need:
1 can breadsticks
1 (12 oz.) can whipped cream cheese frosting
1/4 c. whipping cream
Purple sanding sugar
Green sanding sugar
Gold (yellow) sanding sugar
1. Open the breadsticks and press together the ends of two sticks to make one long stick. Repeat with the remaining breadsticks, forming six long sticks.

2. Take 3 of the long breadsticks and press the ends together.

3. Braid the breadsticks together.

4. Repeat steps 2 and 3 with the remaining breadsticks.
5. Coil braids around one another, forming an oval shape. Press ends together.

6. Bake at 400 degrees for 16-20 minutes or until golden brown.
7. While baking, combine the frosting and whipping cream in a saucepan over low heat. Heat glaze until smooth, stirring constantly.
8. Pour the glaze over the cake and sprinkle with chocolate sprinkles... err, sanding sugars. Whatev.

No, seriously. I love King Cake.
Anyhow, I was first introduced to King Cake in middle school French class when Mme Dodson was teaching us about Mardi Gras. We would have a Mardi Gras celebration and order a King Cake from La Madeleine and whoever got the baby received a prize. While the King Cake was good, my highly developed 7th grade taste buds were not thoroughly impressed.
HOWEVER! My true affair with King Cake began in 2006 when I lived with my good friend Nicole. Nicole's mom is originally from New Orleans and every year around Mardi Gras, we'd get a fresh King Cake from deep in the French Quarter. And when these King Cakes would arrive... WATCH. OUT.
I used to try and trick myself into thinking that I wasn't eating that much, because I'd just cut a sliver here and a sliver there. And then I would look at the King Cake and realized I'd already eaten half of it. And I hadn't even left for work yet.
No, seriously. I love King Cake.
I'd always wanted to attempt to make it, but never really felt like making dough from flour, yeast, rolling it out, etc. I like cooking and baking, but nothing that intense unless it's a really special occasion. However, few weekends ago I was flipping through the TV and because it was Sunday morning and there were no crime shows on, I settled on Semi-Homemade with Sandra Lee. Sidenote: This woman has some really good ideas, but damn if there isn't something about her that makes me want to punch her square in the jaw. Not sure what it is. But, the recipe seemed easy, so thought I would try it.
Two caveats: Although Mardi Gras was today, I actually made this a couple of weeks ago. Sprinkling purple, green, and yellow sugar didn't seem appropriate at the time, so I just used chocolate sprinkles instead. Also, since I wasn't making this for Mardi Gras and no special guests in particular, I didn't insert the plastic baby. If you wanted to do that, you would hide the baby in one of the braids after removing the cake from the oven and before frosting it.
What you need:
1 can breadsticks
1 (12 oz.) can whipped cream cheese frosting
1/4 c. whipping cream
Purple sanding sugar
Green sanding sugar
Gold (yellow) sanding sugar
1. Open the breadsticks and press together the ends of two sticks to make one long stick. Repeat with the remaining breadsticks, forming six long sticks.
2. Take 3 of the long breadsticks and press the ends together.
3. Braid the breadsticks together.
4. Repeat steps 2 and 3 with the remaining breadsticks.
5. Coil braids around one another, forming an oval shape. Press ends together.
6. Bake at 400 degrees for 16-20 minutes or until golden brown.
7. While baking, combine the frosting and whipping cream in a saucepan over low heat. Heat glaze until smooth, stirring constantly.
8. Pour the glaze over the cake and sprinkle with chocolate sprinkles... err, sanding sugars. Whatev.
Now, let it be said that this cake is good. It would obviously take a significant amount more work to get it to the New Orleans French Quarter caliber, but it was still really good (read: it was gone in less than 24 hours). Matt especially liked it because it "wasn't too sweet." I didn't know there was such a thing.
But I think it needs a little more flavor.
I did a little searching and found that many of the recipes that make this from scratch include cinnamon, jam, stuff with flavor. Then, I found this recipe and while I don't necessarily want to make mini King Cakes, I do like the cinnamon roll aspect. I think next time I'll use the exact same recipe from Sandra Lee, except I'll try canned cinnamon rolls.
Monday, February 23, 2009
The Housewife Wannabe Cooks: Oh Me Oh My DIET Chicken Tenders with Tomato Jam
Ok, so I realize yesterday I said I would post four recipes this week. I also realize that these four recipes are part of what's contributing my feelings of large-ness lately and I have decided that I'm going to attempt some Weight Watchers on my own. It's how I lost 10 pounds before my wedding, so I know it will work, but it's just about committment. And I'm serious this time. Sorta.
All of this to say, this is not one of the recipes I mentioned yesterday. But it was so good, I couldn't resist!
Anyhow, based on this new dieting and thanks to the bi-monthly Weight Watchers magazine (March/April 2009 issue) to which I subscribe, I found this AWESOME diet chicken fingers recipe. With tomato dipping jam to boot! And, despite the comedy of errors I had in making this, it turned out really good. Now don't get me wrong. This is not your grandmother's homemade deep fried chicken. But it's pretty damn good. Especially when dieting.
Let's begin!
First, we're gonna make the tomato jam. Now let it be said, I will probably not make this part again. Good? Yeah. Would some marinara sauce from a can work equally well? Absolutely. Especially when you're a corporate monkey and don't get home until 7:30. BUT! Now I know better.
What you need:
2 t. olive oil
1 large shallot, finely chopped
2 t. grated peeled fresh ginger
1 (14.5 oz) can diced tomatoes, drained
1 t. sugar
pinch cayenne
1. Heat the olive oil in a saucepan over medium heat. Please ignore the strawberry puree, rum, and lime juice in the background. My sister's boyfriend is really into daiquiris lately.

mmm - oily!
2. Add the shallot and ginger and cook for approximately 5 minutes or until tender. Now. Let it be known that I hate onion. Love the flavor, hate the texture. Also. A shallot is pretty much the same thing as an onion. So I threw that bitch into the food processor first.
 Die Evil Onion-like Creature!
 Aaahhh - much better!
3. Add the can of drained tomatoes.

4. Add a teaspoon of sugar.

Enter error #1 - I added a pinch. I promptly corrected the error. Again, please ignore the daiquiri fixings.
5. Add a pinch of cayenne pepper (See how I got confused above? It could have happened to anyone!). Ahh, but wait. Enter error #2. I didn't have any cayenne pepper. So I used a dash of dried red pepper flakes and a dash of chipotle chili pepper. I could add a picture, but it's not a whole lot different than the one above.
6. Bring to a boil, reduce heat and simmer for 15 minutes to evaporate the liquid. Please imagine what it looks like. I forgot to take a picture.
NOW. I also don't really like tomatoes too much. Flavor? Yes. Texture? No. Thank. You. I eat marinara, pizza sauce, ketchup, etc. But actual tomato chunks? Forget it. So I pureed. Just a personal preference.
Onto the delightful chicken tenders.
What you need:
2 slices whole wheat bread, torn up
1/2 c. Greek-style fat-free yogurt
1 lb. chicken tenders
1 t. dried thyme
1/2 t. salt
1/2 t. coarse ground black pepper
1. Crumble the whole wheat bread in a food processor. I left the bread out on the counter while I was at work to make it a little stale. The middle was still a little soft, and had trouble crumbling in the food processor, so next time I will tear the slices in half.


Ta-Da!
2. Transfer the crumbs to a skillet over high heat.

Whoops, that's not a skillet (Error #3!)
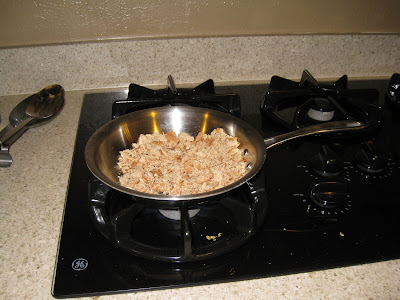
Here we go.
3. Toast bread crumbs over the heat, stirring constantly, for approximately 4 minutes.

4. Sprinkle the thyme, salt, and pepper over the chicken. I ended up using garlic salt and seasoned pepper for some more flavor. I also likely used more than 1 t. of thyme seeing as how I just estimated, but HEY! It's diet - we need more flavor since we're cutting back on the grease.

5. Put the yogurt in a bowl.

6. Stir the chicken in and coat well.

7. Transfer the bread crumbs to a shallow bowl and toss in chicken to coat.

I love how they got lonely and cuddled up to one side together!
8. Place the tenders on a a baking sheet and bake at 500 degrees for approximately 10 miuntes, or until cooked through.

O
M
G
(I think you know what to do with the daiquiri fixings)
9, Try not to eat these all in one sitting. Remember - you're on a diet! HA!
ENJOY!
Sunday, February 22, 2009
A Whole Lotta Cookin' Goin' On
Over the past two weeks I have really been busy in the kitchen trying out some new recipes. Due to a long night of drinking last night in celebration of my upcoming birthday, I'm incredibly tired but plan on posting the following recipes later this week:
Valentine's Cookies
Garlic Butter
King Cake
Mystery Rolls
All of the above are guaranteed to make you gain anywhere from 4 to 8 pounds. So be proactive and get to the gym! Just don't make this mistake.
Valentine's Cookies
Garlic Butter
King Cake
Mystery Rolls
All of the above are guaranteed to make you gain anywhere from 4 to 8 pounds. So be proactive and get to the gym! Just don't make this mistake.
Thursday, February 19, 2009
A Blast From The Past
My sister and I recently were trying to remember a Christmas movie we used to watch as kids. I've noticed as I've gotten older that the children's Christmas movies from my generation are, frankly, creepy. We didn't think they were creepy at the time, but I mean, remember clay-mation Rudolph? CREEPY.
I digress.
We couldn't remember much about the movie, except that it involved toys that came to life when the children left the room. And these toys for some reason we couldn't recall ventured downstairs to the living room on Christmas Eve.
Through an email exchange today, we remembered discussing this movie the other day. Since we're both corporate monkeys and sit at computers about 95% of the day, we commenced our respective Google searches. Almost immediately, we each found the movie on the Internet Movie Database and simultaneously emailed each other with the excitement that we had found our beloved creepy film. Shockingly, it's down 2% in popularity this week.
Although you can purchase this movie online, based on the reviews it appears that the DVD version doesn't include the Kermit cameo or the sing-a-long of all the toys, including the formerly dead but magically resurrected ones, at the end.
You read that correctly. Dead toys. It was the 80s. Gimme a break.
You can also watch it for free on You Tube in five parts. Which I did today. Unfortunately, the Velveeta commercial I remember fast forwarding through on the VHS version we recorded from TV is not included.
Subscribe to:
Posts (Atom)